Fab Academy 2016
Home / W1
Html Css
During this first week I had to install Linux and create a personal web page.
I have a Mac so I installed Linux on a virtual machine and I used VMware Fusion and I did not find problems during installation.
I'm a web developer and I have written pages in HTML and PHP.
So I know programming languages for the web (HTML CSS) so I realized a responsive web template for this project.
In this years I have written several templates and I develop my personal site from one of these.
For every increase knowledge of HTML tags the reference site is W3C
To write my first template responsive I'm start from the following guide CSS Device Adaptation Module Level.
The second focus for this week was to learn the system git version control and I had never used git for a project.
The second focus for this week was to learn the system git version control and I had never used git for a project.
The main controls of Git are
- git pull [download all updates]
- git add [add and modified the files with the new version]
- git status [check changes made]
- git commit -m "description file changes made" [create a commit with description about changes made] git push origin master [upload all on Git]
Final Project
My final project is to create a multi touch screen cheap for a museum or a school . The touch screen will be realized with support of wood or cardboard with a rigid transparent glass or Plexiglas , a video projector and a webcam .
When I decided to build a multitouch table I looked information on the internet and found the the project of Seth Sandler Mtbiggie.
A Multitouch Biggie, MTbiggie for short, is a low-cost multitouch table and it uses the "Front Diffused Illumination" multi-touch technique, with normal ambient light (infrared not required or needed) and a normal off-the-shelf webcam (IR filter can still be in place). The MTmini technique is the first step in creating a full multitouch display.
So I decided to investigate what is "Front Diffused Illumination" and always looking on the internet I found the NUI group site.
Diffused Illumination (DI)
Diffused Illumination (DI) comes in two main forms. Front Diffused Illumination and Rear Diffused Illumination. Both techniques use the same basic principles.
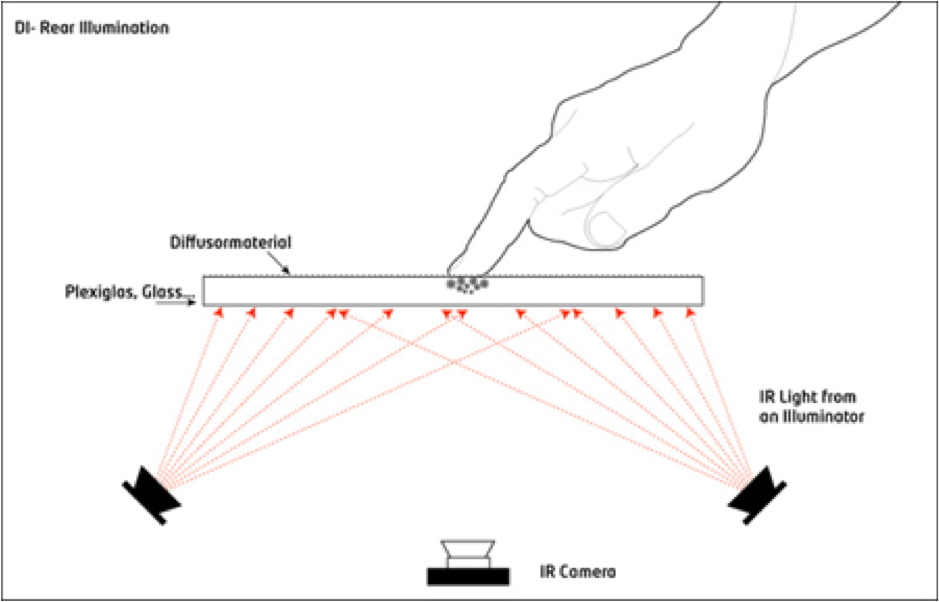
Rear DI
Infrared light is shined at the screen from below the touch surface. A diffuser is placed on top or on bottom of the touch surface. When an object touches the surface it reflects more light than the diffuser or objects in the background; the extra light is sensed by a camera. Depending on the diffuser, this method can also detect hover and objects placed on the surface.
Front DI
Infrared light (often from the ambient surroundings) is shined at the screen from above the touch surface. A diffuser is placed on top or on bottom of the touch surface. When an object touches the surface, a shadow is created in the position of the object. The camera senses this shadow.
Continuing research to better understand the material I found this configurations Frustrated Total Internal Reflection(FTIR) and Diffused Surface Illumination (DSI).
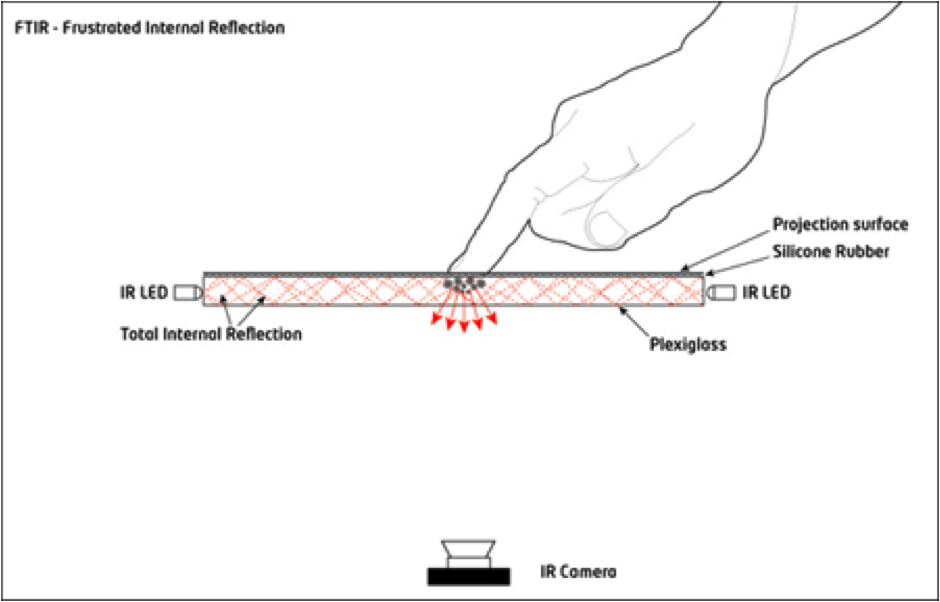
FTIR stands for Frustrated Total Internal Reflection
It is a name used by the multi-touch community to describe the multi-touch methodology developed by Jeff Han (Han 2005). The phrase actually refers to the well-known underlying physical phenomena underlying Han’s method. Total Internal Reflection describes a condition present in certain materials when light enters one material from another material with a higher refractive index, at an angle of incidence greater than a specific angle (Gettys, Keller and Skove 1989, p.799). The specific angle at which this occurs depends on the refractive indexes of both materials, and is known as the critical angle, which can be calculated mathematically using Snell’s Law.
When this happens, no refraction occurs in the material, and the light beam is totally reflected. Han’s method uses this to great effect, flooding the inside of a piece of acrylic with infrared light by trapping the light rays within the acrylic using the principle of Total Internal Reflection. When the user comes into contact with the surface, the light rays are said to be frustrated, since they can now pass through into the contact material (usually skin), and the reflection is no longer total at that point.
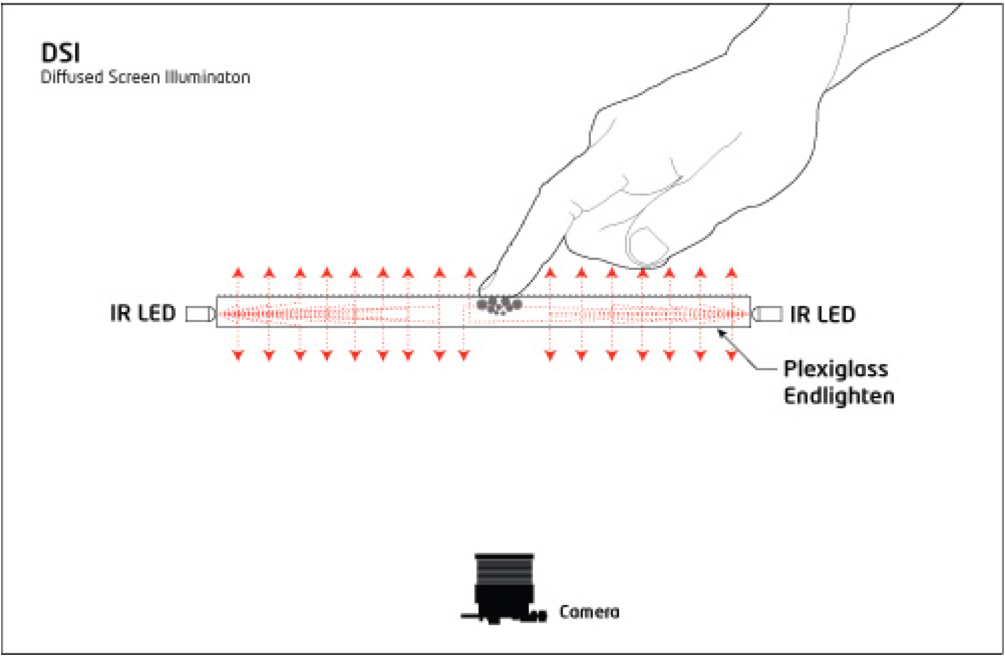
Diffused Screen Illumination
DSI uses a special acrylic to distribute the IR evenly across the surface. Basically use your standard FTIR setup with an LED Frame (no compliant silicone surface needed), and just switch to a special acrylic. This acrylic uses small particles that are inside the material, acting like thousands of small mirrors. When you shine IR light into the edges of this material, the light gets redirected and spread to the surface of the acrylic. The effect is similar to DI, but with even illumination, no hotspots, and same setup process as FTIR.
Technique Comparison
So I tried to understand “What is the best technique?”
Unfortunately, there is no simple answer. Each technique has it’s pro and cons. The answer is less about what is best and more about what is best for you (which only you can answer).
The General consensus is: If you need object, fiducial, and hovering recognition than rear DI is most likely for you. If you only need a robust and reliable finger recognition, than FTIR is a great choice. Front DI, although the simplest to build, is rarely used as a permanent setup since it heavily relies on the surrounding environment.
FTIR:
Pros:
- An enclosed box is not required
- Blobs have strong contrast
- Allows for varying blob pressure
- With a compliant surface, it can be used with something as small as a pen tip
- Setup calls for some type of LED frame (soldering required)
- Requires a compliant surface (silicone rubber) for proper use
- Cannot recognize objects or fiducial markers
- Cannot use a glass surface
Pros:
- No need for a compliant surface, just an diffuser/projection surface on top/bottom
- Can use any transparent material like glass (not just acrylic)
- No LED frame required
- No soldering (you can buy the IR-Illuminators ready to go)
- Simple setup
- Can track objects, fingers, fiducials, hovering
- Difficult to get even illumination
- Blobs have lower contrast (harder to pick up by software)
- Greater chance of ‘false blobs’
- Enclosed box is required
Pros:
- No need for a compliant surface, just an diffuser/projection surface on top/bottom
- Can use any transparent material like glass (not just acrylic)
- No LED frame required
- No soldering (you can buy the IR-Illuminators ready to go)
- Can track fingers and hovering
- An enclosed box is not required
- Simplest setup
- Cannot track objects and fiducials
- Difficult to get even illumination
- Greater chance of ‘false blobs’
- Not as reliable (relies heavily on ambient lighting environment)
Pros:
- No compliant surface (silicone)
- Can easily switch back and forth between DI (DSI) and FTIR
- Can detect objects, hovering, and fiducials
- Is pressure sensitive
- No hotspots
- even finger/object illumination throughout the surface
- Endlighten Acrylic costs more than regular acrylic (but the some of the cost can be made up since no IR illuminators are needed)
- Blobs have lower contrast (harder to pick up by software) than FTIR
When you place your fingers on the surface, shadows are created where your fingers are placed. The webcam sees these shadows and sends the image to the tracking software.
Community Core Vision (CCV) – It is an open-source computer vision framework for multitouch and other emerging interaction types. Community Core Vision is currently maintained by the NUI Group community. CCV is a cross platform software (Apple, Windows and Linux) built on C++ for real-time performance and stability using on common frameworks including openCV and openFrameworks.
TUIO is an open framework that defines a common protocol and API for tangible multitouch surfaces. The TUIO protocol allows the transmission of an abstract description of interactive surfaces, including touch events and tangible object states. This protocol encodes control data from a tracker application (e.g. based on computer vision) and sends it to any client application that is capable of decoding the protocol. There exists a growing number of TUIO enabled tracker applications and TUIO client libraries for various programming environments, as well as applications that support the protocol. This combination of TUIO trackers, protocol and client implementations allows the rapid development of table based tangible multitouch interfaces. TUIO has been mainly designed as an abstraction for interactive surfaces, but also has been used in many other related application areas. Technically TUIO is based on Open Sound Control - an emerging standard for interactive environments not only limited to musical instrument control - and can be therefore easily implemented on any platform that supports OSC.