#Exercise_15
18/05/2016
Assignment
Iinterface and application programmignWrite an application that interfaces with an input &/or output device that you made.
Design an interface to control the the final project board
Source filesFor the assignment I decided to design an interface that will controll the board of my final project when is ont connected to the robot in order to test it. So I decided to use Processing program language that will communicate with the board via the serial port to complete the assignment.
The interface will be able to turn on/off the motor, to turn on/off the air and set the temperature of the heater.
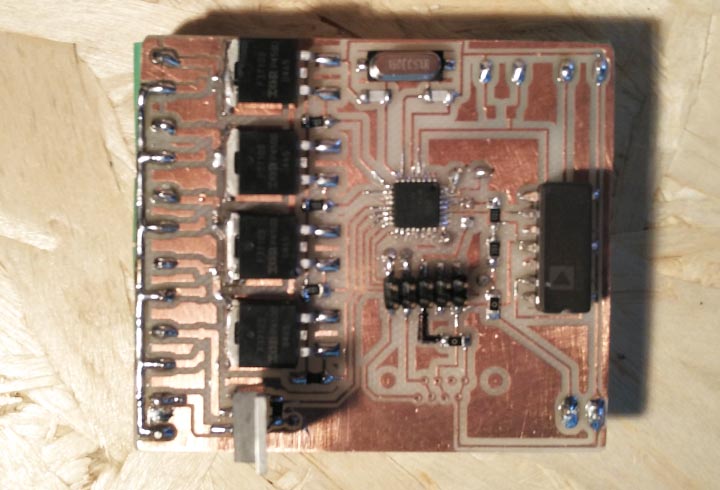
Board: al the actuators are controlled from the PWM pins of the 328P-AU3 microcontroller attached to some mosfet that allow to control high load.
The communication between the computer and the board is done with an FTDI-USB adapter connected to the RX, TX, GND and VCC pins of the microcontroller to the USB port of the computer.
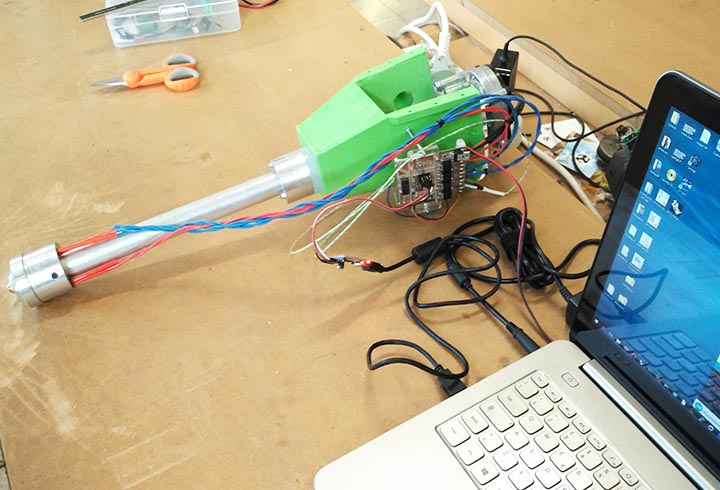
The actuators: This is the first prototype of the final project, with all the actuators that I will go to control with the Processing interface.
Conclusion: the temperature control is not yet ready, with the Knob I'm going to set only a PWM value (but will be ready in a short time). The interface still missing some improuvment, for example a very useful dropdown menu to set up the serial port, that at the moment is necessary to change from the code.
I found Processing with the controlP5 library very powerful and easy to use, moreover is impressive how easy is export a stand alone program.
Processing Code
					import processing.serial.*;
					import controlP5.*;

					Serial myPort;  // Create object from Serial class
					ControlP5 cp5;  // Create object from ControlP5 class
					Knob myKnobA;   // Create a knob
					PShape motor, air, heater;  // Create objects from PShape

					void setup() {
					  size(498, 250);


					  // Open whatever port is the one you're using.
					  String portName = Serial.list()[0];
					  myPort = new Serial(this, portName, 9600);
					  cp5 = new ControlP5(this);

					  motor = loadShape("motor.svg");
					  air = loadShape("air.svg");
					  heater = loadShape("heater.svg");

					  //setup the first button parameters
					  cp5.addIcon("air", 10)
					    .setPosition(25, 160)
					    .setSize(120, 50)
					    .setRoundedCorners(10)
					    .setFont(createFont("fontawesome-webfont.ttf", 40))
					    .setFontIcons(#00f205, #00f204)
					    .setSwitch(true)
					    .setColorBackground(color(255, 100))
					    .hideBackground();
					  //setup the second button parameters
					  cp5.addIcon("motor", 10)
					    .setPosition(185, 160)
					    .setSize(120, 50)
					    .setRoundedCorners(10)
					    .setFont(createFont("fontawesome-webfont.ttf", 40))
					    .setFontIcons(#00f205, #00f204)
					    .setSwitch(true)
					    .setColorBackground(color(255, 100))
					    .hideBackground();
					  //setup the knob parameters
					  myKnobA = cp5.addKnob("heater")
					    .setRange(0, 255)
					    .setValue(80)
					    .setPosition(365, 138)
					    .setRadius(50)
					    .setDragDirection(Knob.VERTICAL);
					}

					void draw() {
					  textSize(12);
					  noStroke();
					  fill(200);
					  rect(0, 0, 166, 250);
					  fill(0, 102, 153);
					  text("Motor Control", 10, 15);
					  fill(220);
					  rect(166, 0, 166, 250);
					  fill(0, 102, 153);
					  text("Air Control", 180, 15);
					  fill(240);
					  rect(332, 0, 166, 250);
					  fill(0, 102, 153);
					  text("Heater Control", 350, 15);
					  // Draw the icon at coordinate and size
					  shape(motor, 25, 20, 120, 120);
					  shape(air, 190, 20, 120, 120);
					  shape(heater, 365, 28, 100, 100);
					}

					//send data to the board
					void motor(boolean theValue) {
					  //println("got an event for icon", theValue);//debug
					  if (theValue == true) {
					    myPort.write('C');
					  } else {
					    myPort.write('D');
					  }
					}

					//send data to the board
					void air(boolean theValue) {
					  //println("got an event for icon", theValue); //debug
					  if (theValue == true) {
					    myPort.write('A');
					  } else {
					    myPort.write('B');
					  }
					}

					//send data to the board
					void heater(int theValue) {
					  //println("a knob event. setting background to "+theValue);//debug
					  myPort.write(theValue);
					}
Arduino Code
					#define R1 3
					#define R2 9
					#define R3 6
					#define MOT 13
					#define AIR 5

					char val; // Data received from the serial port

					void setup() {
					  // Start serial communication at 9600 bps
					  Serial.begin(9600);
					  pinMode(R1, OUTPUT);
					  pinMode(R2, OUTPUT);
					  pinMode(R3, OUTPUT);
					  pinMode(MOT, OUTPUT);
					  pinMode(AIR, OUTPUT);
					}

					void loop() {
					  while (Serial.available()) { // If data is available to read,
					    val = Serial.read(); // read it and store it in val
					  }

					  //set the value of the knob to the heater
					  analogWrite (R1,val);
					  analogWrite (R2,val);
					  analogWrite (R3,val);

					  if (val == 'A') { // If A was received
					    digitalWrite(MOT, HIGH); // turn the motor on
					  } else if (val == 'B') {
					    digitalWrite(MOT, LOW); // Otherwise turn it OFF
					  }
					  else if (val == 'C') {//If C was received
					    digitalWrite(AIR, LOW); // turn the air ON
					  }
					  else if (val == 'D') {
					    digitalWrite(AIR, LOW); // Otherwise turn it OFF
					  }
					  delay(30); // slowdown
					}
Interface: that one was the first time that I have used processing to design an interface, so I designed something very easy using the very good library ControlP5, so the code is modified and merged version of the icon controlp5 example and serialwrit example.
The interface is divided in three section, in the first one we have a witch to cntrol the moto, in the second one another witch to control the air and finally a knob to set up the temperature.