Exercise 12 - Molding & Casting
Assignment
The assignment for this week is to
- design a mold
- machine it, using a full 3-axis toolpath
- cast parts from it
I was away in Boston the entire week of molding & casting, so have not managed to complete this assignment at that time. We finally managed to locate a dealer for Smooth-On products here in Singapore and ordered 2 sets of Sorta Clear 37 and Liquid Plastic, as those were products that he had on hand. In the mean time, we had been using the Easy Mold and Easy Cast products from Castin'Craft. I've only been able to work on my outstanding assignments after my final presentation on 22 June.
Investment Casting
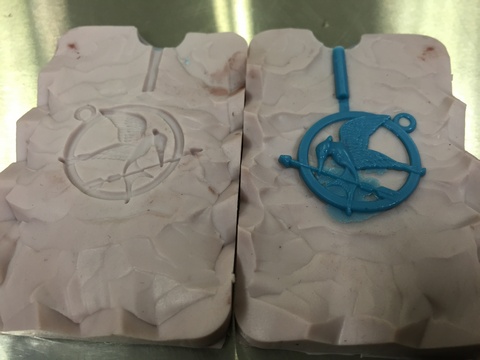
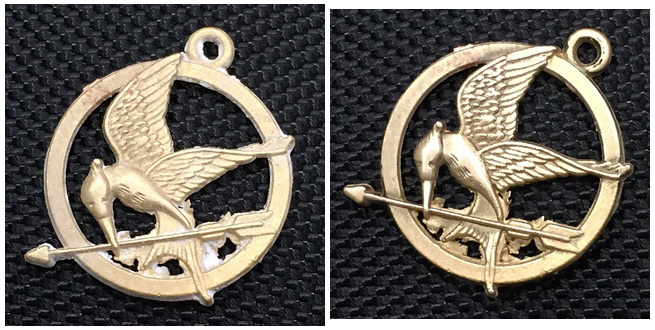
I have previously made a Mockingjay pendant of brass, using the lost-wax method for investment casting during Fab Academy 2015. We are quite fortunate here in SP, because amongst the various academic schools, we really do have a lot of facilities and resources available. However, not all of these facilities are readily accessible to everyone who is interested in learning about such things. It becomes more of a matter of whether you know the right person to ask for access to these resources. This seems such a shame as many of these facilities have very wonderful machines which would be of great interest to many in our fablab community.
From the Wikipedia page, I realized that investment casting has been around for the last 5,000 years and can be used to cast both small and extremely large objects weighing several hundred pounds. This method is very useful, especially in producing very complex or thin objects, which cannot be manufactured using any other methods, as molten wax can flow into even tiny crevices and replicate very fine details.
I always thought that the term "investment" in investment casting came about because of the loss of the material (wax) during the process, but apparently, the word here means to clothe or surround, i.e. the wax pattern being invested (surrounded) with a refractory material. The pattern material is typically wax, but can be any material, as long as it can be completely combusted.
The investment casting setup that we have here in SP, in our Materials laboratory, comes from the jewellery industry, where rings and other intricate jewellery is often made using the lost-wax method. The silicone molds that we use in the process are cut professionally by a jewellery equipment supplier and come as two part molds, which we use to teach our students about this process.
Investment Molding Process
The first step is to create the pattern material. To do this, I sandwiched my selected mold between a pair of aluminum plates. The mold is then held to a molten wax extruder. The extruder creates a vacuum in the mold, then injects molten wax into the mold. After a few minutes, the mold is separatd and the wax pattern is extracted.
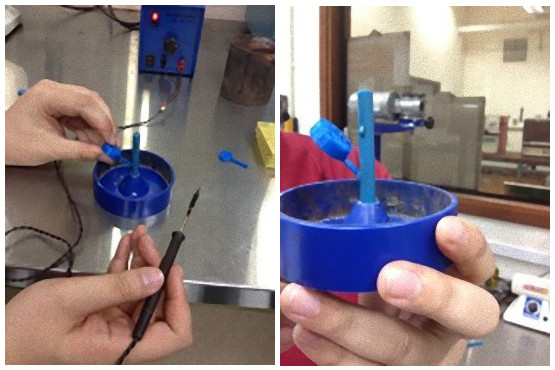
A sprue wax trunk is then attached to the sprue base and my wax pattern "soldered" to the trunk using a fine tipped jewellery soldering iron. Once all the wax patterns have been attached, the flask (an open-ended cylinder) is placed over the sprue base.
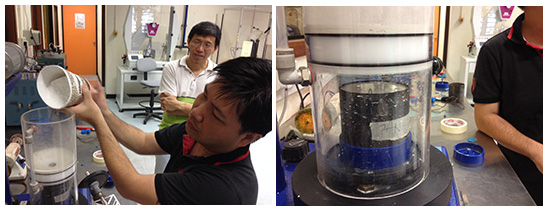
A slurry is then created using a mix of satin cast 20 and water (480g of satin cast to 220 ml of water). This is done in a de-bubblizer, a vibrating vacuum mixer, which agitates the slurry, to get an even mix and to minimize bubbles. The whole process took about 3 minutes. The flask is left to set at room temperature overnight.
The flask is now baked in an oven at 700 degC for 6-8 hrs, in order to completely combust the wax pattern. Once the mold is ready, the investment material (brass pellets) are weighed out. The flask is removed from the burn-out oven using a pair of tongs and placed into the Indutherm MC15 vacuum casting machine. The brass pellets are also put into the MC15 at this time. The brass pellets are heated to a temperature of 1028 degC using a 3.5kW induction heating element. The whole process is quite fast, taking 2 minutes. The lever on the MC15 is then rotated, pouring the molten brass into the flask cavity.
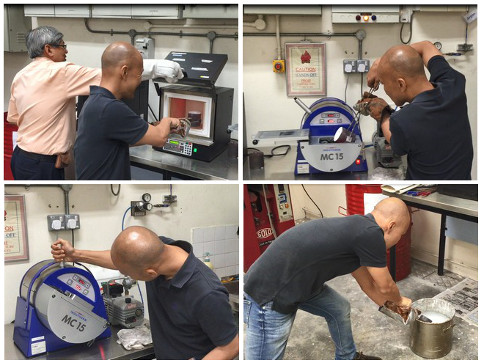
After another 3 minutes, the lever is returned to its original position. The flask is removed from the vacuum casting machine and quenched in a bucket of water. The water dissolves the satin cast and after another few minutes, the brass pieces are recovered from the flask (or bucket if they have fallen in).
To finish off the process, I cut my mockingjay pendant from the stem, cleaned it up with a brush under a running tap, then polished the piece using a polishing wheel and wax. The pictures below show the pendant before and after a quick round of polishing. My finished pendant looks quite pretty and would make a nice souvenir for my daughter :)
Mold Design
I looked at this assignment as an opportunity to learn some new skills and how to operate another essential machine in our Fablab, the Roland MDX-540, and it's accompanying software. The first decision that I had to make was what type of final product I wanted - custom chocolate pieces, a decorative paperweight, perhaps even a nameplate or fridge magnet, maybe even personalized ice cubes for my 3 golden retrievers.
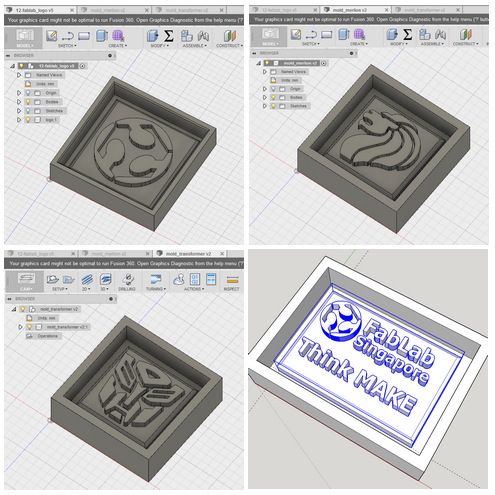
I toyed around with a few designs, done in SketchUp and Fusion 360. There were so many cool and interesting designs that I wanted to do! In the end, I had to settle for just doing one mold, as I did not have the time indulge in my flights of fancy.
Some of the key considerations that I had in selecting my final design were:
- I preferred it to have some association with fablab
- it had to be machinable, within the limits of our MDX-540
- it shouldn't be too large, as the silicone mold compound was expensive
I started off by designing a mold with the fablab logo. To do this, I first downloaded the fablab logo from the Internet. I then opened the logo in Inkscape and converted the bitmap to a vector and saved the file as SVG. I then created the mold base in Fusion 360 and imported the fablab logo SVG, oriented it the right way round, then resized it to fit my mold base.
Once the logo was in position, I converted it to normal lines using the fix/unfix command. The logo was then extruded and the outer wall also extruded to form an integrated container for the silicone mold compound, doing away with the need for external walls.
I started with an initial size of 100 x 100 x 21mm for my design. I measured the smallest feature in the design (2.17mm), to make sure that it could be machined in our MDX-540, which had a smallest tool size of 2.0 mm.
Once the 3D model was completed, I saved in onto the Autodesk cloud, then exported the model as an IGES file, which could be imported into the MDX-540 SRP player software. I also downloaded the STL version of the file from my account on A360.
Update: The MDX-540 reported that parts of my mold could not be machined. I ended up increasing the size of my mold to 110 x 110 x 21 mm, using the scaling feature in SRP-player.
Machining the Foam Mold
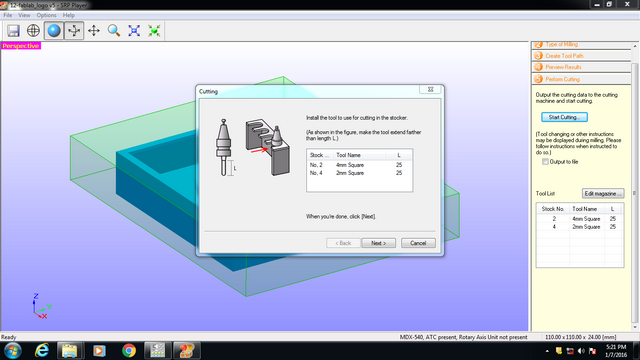
To machine my mold, I started up VPanel after the MDX-540 had been turned on. Since it was 4 weeks since I last used the machine, I first measured the tool length again, to make sure that all 4 tools in the ATC were correctly registered. I then set the origin to the middle of my workpiece in User Coordinate System (UCS). The z-axis origin was measured using the built-in probe sensor.
Once the machine had been set up, I opened my IGES file in SRP Player. The next step is to set the model size and orientation. For some unknown reason, both Inventor and Fusion 360 uses a different orientation when creating the 3D model (XZ-plane is top view and XY-plane is front view), compared to conventional orientation used by most CNC machines, so my model ended up oriented the wrong way in SRP Player.
To fix the problem, I selected View > Top and clicked on the buttons around the man icon, until I had the correct top view. Once that was done, I changed the view back to View > Perspective.
The next step in the process is to select the type of milling operation - better finish or faster cutting time, mostly flat or curved surfaces and one-sided or 2-sided milling.
Step 3 required me to create the Tool Path for the milling operation. The type and dimensions of the stock material are also specified here. Clicking on the Edit button brings up another window, where the toolpath parameters can be edited. SRP Player classifies the milling operation into Roughing and Finishing steps. For each type of operation, you choose the size of border, cut area, depth of cut, type & size of mill bit and the cutting parameters. You have the option to perform both roughing and finishing operations, or either one selectively.
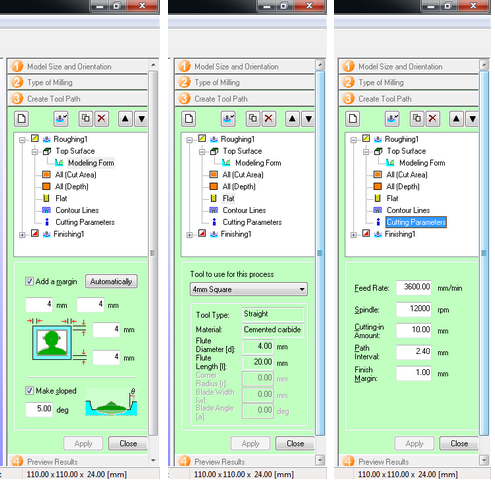
Once the Tool Path paramters have been set, the result can be previewed. Before starting the cutting operation, I performed a surfacing step. This is done by clicking on the Options > Surfacing. The cutting operation is initiated in Step 5 Perform Cutting.
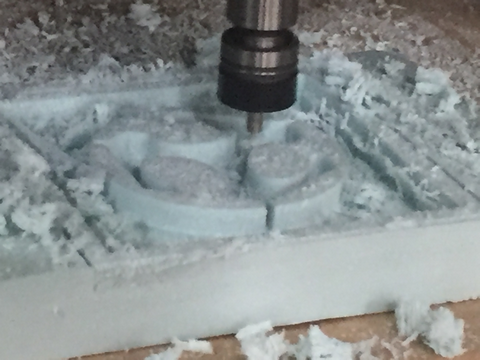
I found it a lot more effective running the roughing and finishing operations separately. I started of by using the 6mm flat endmill for my initial roughing operation, but found that it left too much material behind. I progressively reduced the endmill diameter to 4mm, then to 3mm. For my CAD model, I found the 3mm diameter endmill most effective for the roughing step.
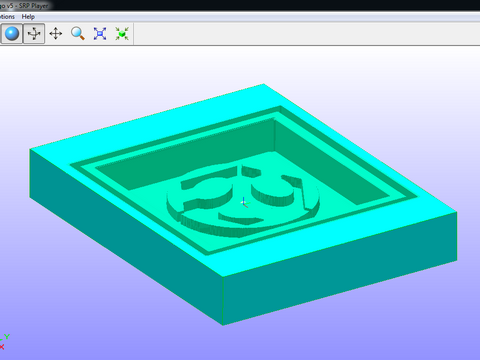
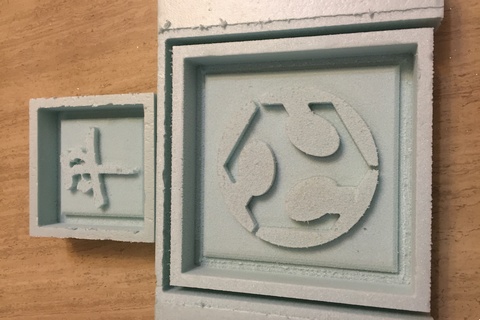
The last step was to perform the finishing cutting. Because of the small size of some of the features in my model, I used a 2mm endmill for this step. To speed up the process, I experimented with the cut area and cut depth, using partial rather than full cuts. My finished mold is shown below.

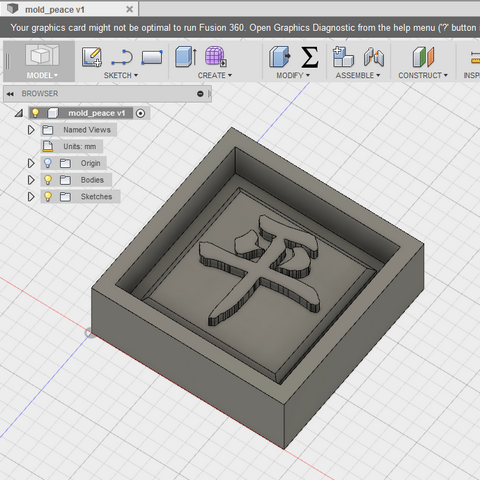
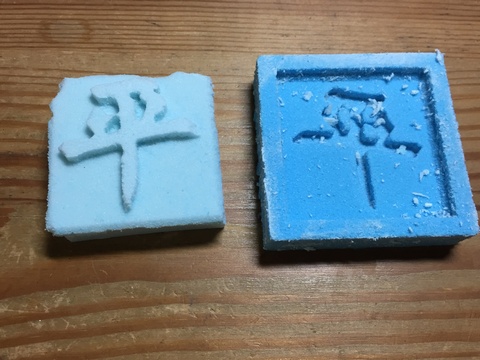
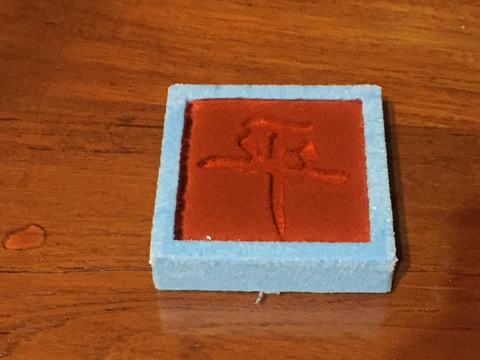
After much contemplation, I decided not to use my Fablab logo mold. I found the size of the mold too large and it seemed too wasteful to use so much silicone compound for such a simple design. I decided to design a smaller mold, with a calligraphic chinese character instead.
I settled on the chinese character for peace and machined the mold using the same steps as before.
Creating Silicone Mold
I started off by reading the instructions and MSDS for Castin'Craft's Easy Mold. This is a food safe silicone molding compound, with a curing time of 24 hours, slightly shorter at higher room temperatures. The compound does not need any vacuum degassing, which makes it a very convenient material to use. I next read the instructions and MSDS for Smooth-On's Sorta Clear 37. This is a clear silicon molding compound, very useful if the mold has to be cut out to extract the source pattern inside. Sorta Clear 37, however, requires vacuum degassing, without which it becomes sorta unclear or opaque, which defeats the purpose of using this compound. It is also a food safe product, with a pot life of 25 min and a much shorter curing time of 4 hrs.
Since I did not have any vacuum pump at hand, I decided to use Easy Mold instead of Sorta Clear 37 for my silicone mold. Both products use a 1:1 ratio of resin to hardener.
To determine the volume of molding compound I needed, I filled my foam mold with rice and poured this into a measuring cylinder. This gave me a measured volume of 80 ml, which meant that I needed 40 ml of resin and 40 ml of hardener. I marked out the 40 ml and 80 ml levels on the cup which I would be using as a mixing container ahd proceeded to pour in the resin, followed by the hardener, to the required levels, stirring slowly to ensure a good mix of both compounds. The resin is colored blue and the hardener white. One way to guage if the 2 compounds is thoroughly mixed is to look out for all blue or all white parts in the mixture.
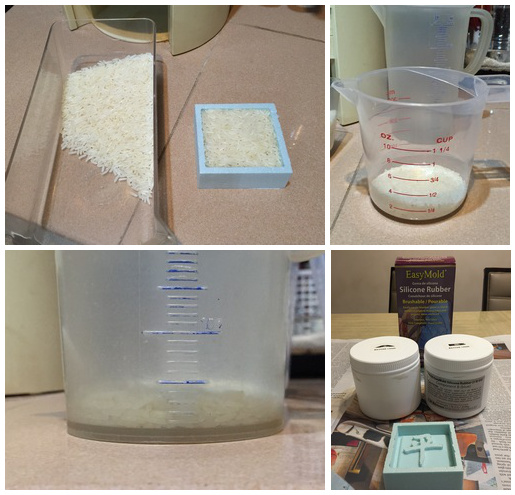
After stirring for 3-5 minutes, I let the mixture settle for another 3 minutes. I then proceeded to slowly pour the mixture into my mold in a thin stream, starting at the lowest level of my mold. I found that increasing the 'pouring' height to 18" - 24" allowed me to maintain a very fine stream of the silicone mold mixture.
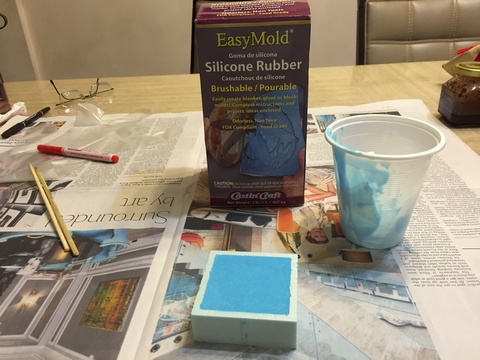
Once my mold was completely filled up, I put it aside and allowed it to cure at room temperature. Some users recommend tapping the mold gently for the first 15 minutes or so, in order to assist in the release of any trapped air bubbles. I did not have to do this for my mold.
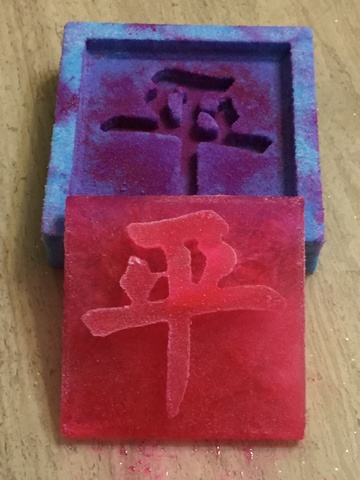
After leaving the silicone mold to cure overnight for 24 hrs, I proceeded to separate the silicone mold from the foam master. I initially tried to do this without damaging my foam master, but found this difficult. After cutting away the sides of my foam master, the silicone mold was easily extracted. I proceeded to clean up my silicone mold with a brush under a running tap and the end result can be viewed in the picture below.
A few thoughts come to mind from my experiences
- Using blue foam as the master is fine, but use acrylic or wood as side wall, as the silicone mold cannot be removed without destroying the side walls
- Instead of using straight walls, add a slight slope - this would make mold removal easier
- The silicone compound picks up very fine details. If you want a smooth finish, use machinable wax or HDPE instead and mill with a very fine surface finish
- Know the capabilities & limitations for your milling machine and the tools used in the machine.
Making Peace
Why making peace? That's because the word in my mold is the chinese character for peace, lol. When I first started on this project, I thought of making plaster of paris or resin cast souvenir pieces. After discovering that the silicone mold material that we bought is classified as a food safe product, I felt it would be a waste to jump into using my mold for resin or ceramic mix (ceramix) casting, as I wanted to keep the option of using it for food products, e.g. chocolate.
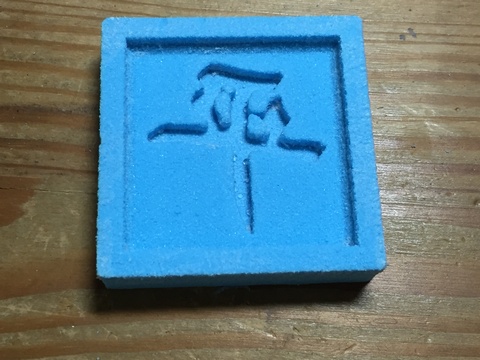
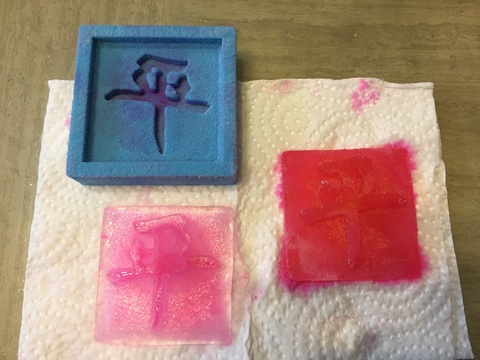
To test out the quality of my mold, I decided to use it to make simple ice squares - squares because the height is much lower than the width and depth. What I was interested in was the quality of the molding, how well formed the character is. Plain water is colorless - not too interesting, so I decided to add a few drops of red coloring used in confectionery to the water. Stir well and pour it into the mold, then put the mold into my freezer.

After a couple of hours, I went to my freezer to check on the status of my special ice square. It was frozen solid. I tried extracting it - no problems whatsoever. The peace character came out very well defined and red makes it stand out beautifully. The mold, however, was also somewhat stained by the coloring I used. I decided to just pour water into the mold and see what a "clear" ice square would look like. Checked on the results the next morning, found that it is not as nice as my red ice cast. It did however clean up my mold.
Reflections
I found this week's assignment very interesting. It gave me a chance to learn how to use a new machine, the Roland MDX-540. I also had the opportunity to explore molding and casting, find out some of the limitations and techniques for making better molds. In creating my molds, I also learned many of the finer points of operating the MDX-540, things which were not taught in the standard Roland training.
I wanted to make some bas relief molds as well, with images of my GRs in profile or perhaps famous personalities or landmark buildings. I tried downloading and installing ArtCAM Insignia (demo) and ArtCAM for Education. I was hoping to craete a few bas relief molds. However, I was somewhat disappointed because ArtCAM for Education does not have CAM capability and ArtCAM Insignia demo has the save feature disabled. Perhaps I can find out how to do this in Fusion 360, or convince my boss to purchase a copy of ArtCAM Pro for our Fablab... (ever hopeful).
Downloads
The files that I created for this assignment can be download using the links below:
- Base for mold - add your own picture for a custom mold
- Fablab logo
- Peace calligraphy
- Transformer logo
- Merlion logo