Electronic Design and Production
Evaluate software for circuit board design.Guide To Eagle:Hello Echo Button
Show the process for making a circuit board.
- Redraw the hello world board with a button and led.
- Build your board.
Designing a PCB board
Plan the circuit and components.
Look up the components for pin output details.
Select the elements and place them in the schematic.
Wire the schematic.
Switch to Board View
Untangle the elements and re-route where necessary.
I needed to add a jumper to allow for two paths to cross on another.
Route the paths from pins of various elements.
Sometimes the process requires manual re-routing and additional jumpers.
Generate the trace, select the layer that does not contain labels, choose monochrome output.
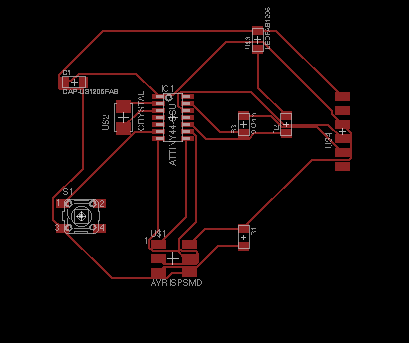
Hello World w/ LED and Button
First off here are the components:
Microcontroller
Resistor(Pull-Up) to help keep RST high(there is an internal one as well.)
Capacitor(Filtering between VCC and G
AVR header
FTDI header
LED
Resistor to regulate current through LED
button
Resistor(pull-down) with button
My first attempt to build a board is documented here: Guide To Eagle:Hello Echo Button
That produced this:
 Lesson Learned:
The traces that run between pads are asking for trouble later on. When given the choice,
choose not to avoid those.
It helped to make the elements spaced far apart when designing, but that is wasteful
when milling.
Even though the program will route traces for you, moving the traces and straightening the paths is
a big part of customizing the board.
Sometimes I like to open the exported png in a graphic tool and make the traces/pads thicker.
This board does not show it, but most the time you only need the top layer(the traces) before exporting.
For our CNC mill, it helps to make sure the origin of the board not too close to the milled paths. Our CNC mill
has a clamp which makes the first 1/2"(appx) in the X and Y direction unusable.
It was not easy to make an elegant board on the first attempt.
In the third(but more like1 0th) attempt, I designed HelloLED with the Attiny45. Fewer pins will make this process easier.
Lesson Learned:
The traces that run between pads are asking for trouble later on. When given the choice,
choose not to avoid those.
It helped to make the elements spaced far apart when designing, but that is wasteful
when milling.
Even though the program will route traces for you, moving the traces and straightening the paths is
a big part of customizing the board.
Sometimes I like to open the exported png in a graphic tool and make the traces/pads thicker.
This board does not show it, but most the time you only need the top layer(the traces) before exporting.
For our CNC mill, it helps to make sure the origin of the board not too close to the milled paths. Our CNC mill
has a clamp which makes the first 1/2"(appx) in the X and Y direction unusable.
It was not easy to make an elegant board on the first attempt.
In the third(but more like1 0th) attempt, I designed HelloLED with the Attiny45. Fewer pins will make this process easier.
The finished(milled and soldered) board is documented/completed in Week 11.