Dew Point Monitoring System for FogCatchers ----------------
Research Station for FC
Dew Point Monitoring System - Electronics and Programming
Step 1- Wi Fi Conection
My starting point is a web I founded in Ardumotive.com, it reads a temperature sensor and sends the data to the cloud via wi-fi, using the ESP8266 device.
I decided to use DHT11 instead of temperature plate made in one previous assignment, because, DHT11 allows to measure also the humidity, and that variable is needed to calculate the dew point.
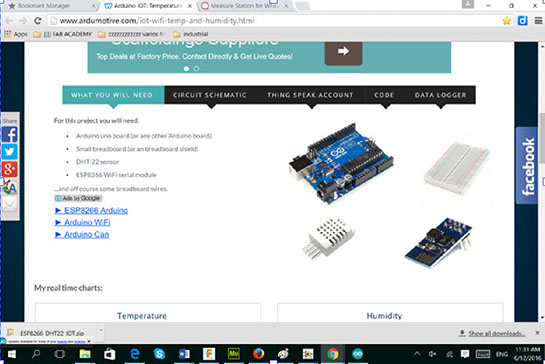
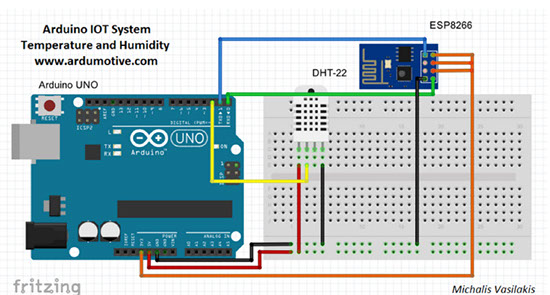
I followed the instructions, with an ARDUINO, to read a temperature/humidity sensor and send it through a ESP8266.
The files with some few changes are here
I made the following changes:
#define DHTTYPE DHT11 // DHT 22 (or AM2302)
instead of DHT22
Considering that in DHT.h library, the type of sensors are defined
// Define types of sensors.
#define DHT11 11
#define DHT22 22
#define DHT21 21
#define AM2301 21
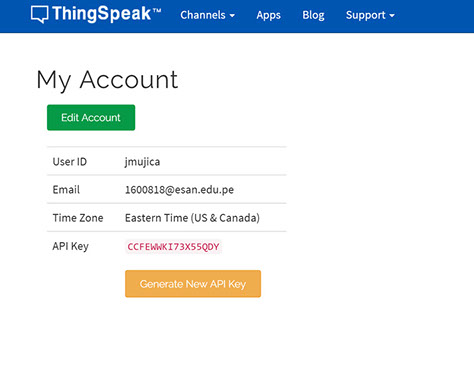
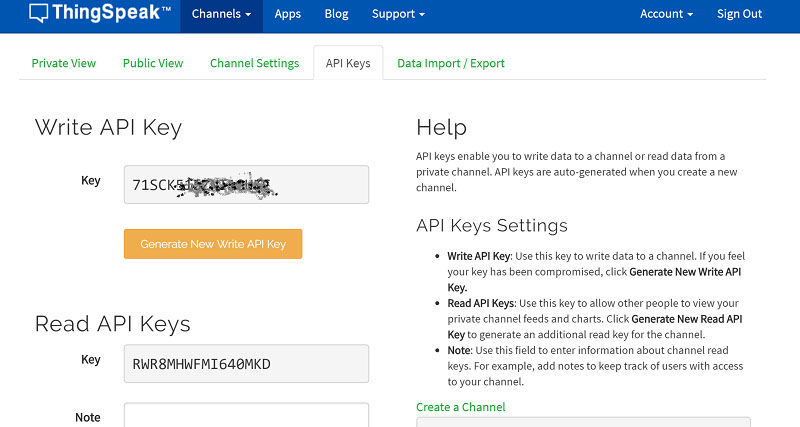
Create an account in Thingspeak, in the following link
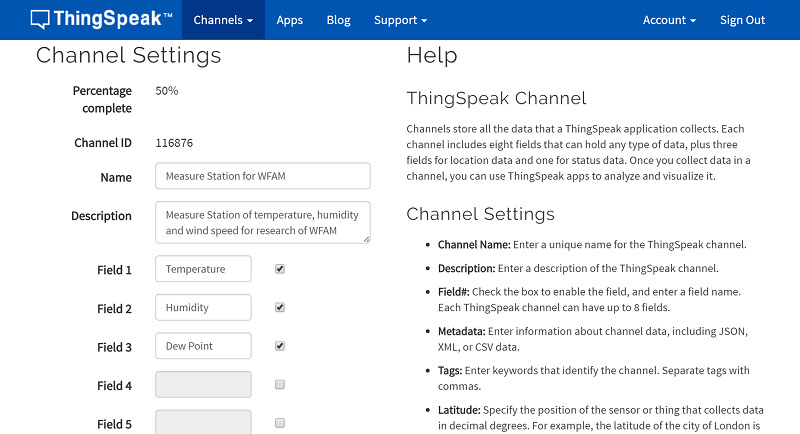
After that, is possible to create a channel here

Look at the Channel Settings
Define the fields
And take note about the codes for updating the Database in ThingSpeak. Look the API keys (in the figure it appears blurred intentionally for keep it in control)
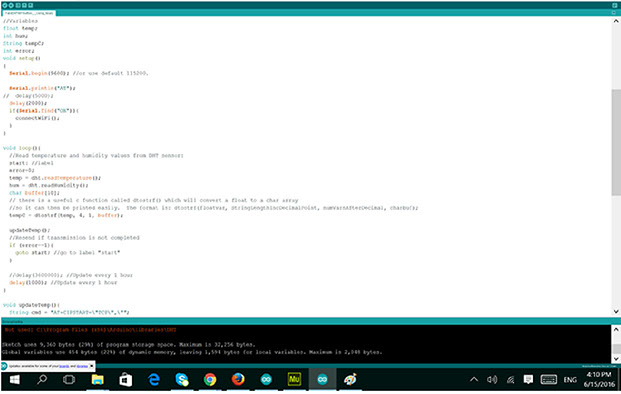
Update the code, with the Write API KEY, found in the Thinkspeak acoount.
Also update the WiFi name and password.
/*-----------------ESP8266 Serial WiFi Module---------------*/
#define SSID "WLAN_****" // "SSID-WiFiname"
#define PASS "Z2C*********" // "passord"
#define IP "184.106.153.149"// thingspeak.com ip
String msg = "GET https://api.thingspeak.com/update?api_key=71SCK5***********"; //change it with your key...
/*-----------------------------------------------------------*/
Preparing for loading the program to the Arduino, remove the RX and TX cables from the Arduino board.
Click on the "Run on Arduino" button to program the Arduino board with this sketch.
The program has been uploaded to Arduino.
Now you can ee-connect the RX and TX cables, because you not need to use the serial monitor any more.
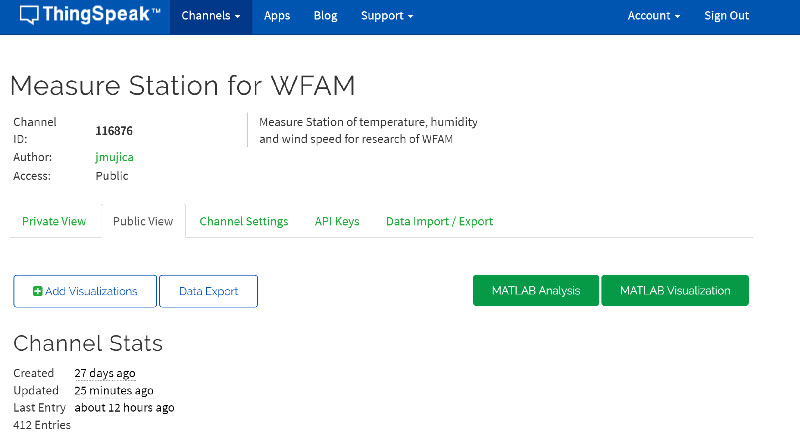
Check the ThingSpeak channel to see the first sensor's info.
But no update in Thinkspeak. I tested it watching the last update time, that in the picture says: "last entry about 12 hours ago". It means it's not receiving and data.
I check all, connections, program, API keys, and repeat many times de programm execution, but the data didn't reach the ThingSpeak Server.
It didnt work, and It was not possible to verify what is going on, or what is happening exactly, because the serial port is already used by the Arduino in the execution moment, to talk with the ESP8266, and the serial monitor cannot be used to trace the problem.
STEP 2 Working in an alternative - using Software Serial Library
Investigating about the problem of the port already used by one service. I found a library that allows Arduino to have more than one serial port.
The reference can be found at Software Serial Library Reference
"The Arduino hardware has built-in support for serial communication on pins 0 and 1 (which also goes to the computer via the USB connection). The native serial support happens via a piece of hardware (built into the chip) called a UART. This hardware allows the Atmega chip to receive serial communication even while working on other tasks, as long as there room in the 64 byte serial buffer."
"The SoftwareSerial library has been developed to allow serial communication on other digital pins of the Arduino, using software to replicate the functionality (hence the name "SoftwareSerial"). It is possible to have multiple software serial ports with speeds up to 115200 bps. A parameter enables inverted signaling for devices which require that protocol."
And it's mentioned as a limitation that If using multiple software serial ports, only one can receive data at a time.
The program that includes the SoftwareSerial Library, to allows to use aditional serial ports is here FabdWiFiSoftSerial UsingLibrary
The library had to be included
#include <SoftwareSerial.h>
And defined the serial pins like this
SoftwareSerial Serial1(10, 11); // RX, TX
SoftwareSerial Serial2(8, 9);
So, I choose to use Serial1 to WiFi comuniction, and Serial2 to read the temperature sensor.
And I set apart the original Serial, to be used by the Serial Monitor. That was a good idea to put Writeline command to show messages and trace what is going on.
But it didn't work. I tried varying the baud rate of the serial ports. But nothing happened.
I couldn't use both aditional serial ports. I can use the serial and serial1, Not Serial 2.
STEP 3 Integrating the temperature solution
Working in an alternative - using Software Serial Library but only for WiFi.
The Serial2, used to read the temperature device, was commented, the final program is FabduinoSendingwithWifi .
So now I have the code, with Software Serial library, working with the Wi Fi plate, that works, with wi fi solution with Serial Software, and uses other serial port to use serial monitor.
Integrating the sketch in STEP1 (for temperature) and sketch in STEP 3 for wi fi, a new program was done. So, using again a diggital pin to read the temperature. The new sketch is here.
Some easy to solve problems happened, like:
That happened because, trying to order my files, I renamed the .ino file. The error was reported as:
Arduino: 1.6.8 (Windows 10), Board: "Arduino/Genuino Uno" GetFileAttributesEx C:\Users\PC\Desktop\]]]]]]] FAB ACADEMY\]]]]]]] FINAL PROJECT\wi fi\Step 3 use SoftwareSerial and Comment Serial2\FabWis2 Fi_-_Fabduino_sends_to_WiFi_SoftwareSerial\FabWiFi_-_Fabduino_sends_to_WiFi_SoftwareSerial\FabWiFi_-_Fabduino_sends_to_WiFi_SoftwareSerial.ino: The system cannot find the path specified. Error compiling for board Arduino/Genuino Uno.
I renamed the file, with a shorter one, and it worked again.
Bauds didnt work with 9600, baud rates are important, it finally worked at 115,200 bauds
Serial1.begin(115200);
//Serial1.begin(9600);
Also you have to consider that DHT22 is a diferent object from DHT11. What happen to me is that Big values were appearing for temperature and humidity, after reviewing the program I realized that the object defined for recording the values was defined for DHT22 device and not for DHT11 device. I changed that.
#define DHTTYPE DHT11 // DHT 22 (AM2302), AM2321
And the results were Ok.
Step 4 Moving to Fabduino
I replaced the Arduino by the Fabduino, first it seemed not to working. After hours of trying to know what wa happening, changing the baud rates. Checking the messages, I realized that eventually the information has been arriving to its destination. I wondered if it was following some pattern, so I put some more tracking messages. And the result was:
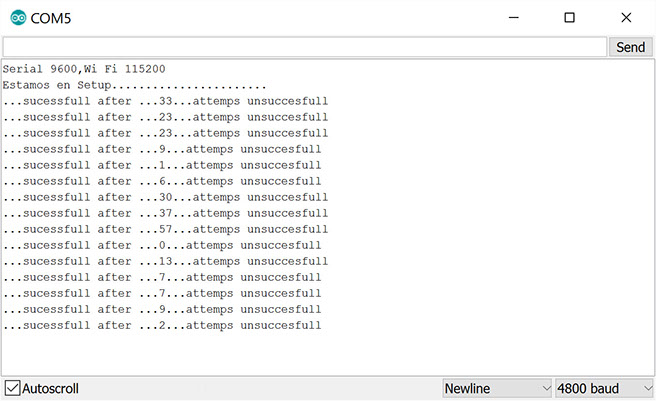
As its seen, there is no pattern in the performance of sending data to the destination.
So now, the configuration is as follows:
![]()
Step 5 Adding a LCD
I evaluate if adding a LCD to the project. I found this project as a reference. From the Arduino Page
Due to the fabduino's pins are occupied by the other actuators, I was trying to move to other pins. I tried this pins assignments.
//LiquidCrystal lcd(12, 11, 5, 4, 3, 2);
//LiquidCrystal lcd(9, 8, 5, 4, 3, 2);
//LiquidCrystal lcd(9, 8, 5, 4, 1, 0);
LiquidCrystal lcd(5, 4, 3, 2, 1, 0);
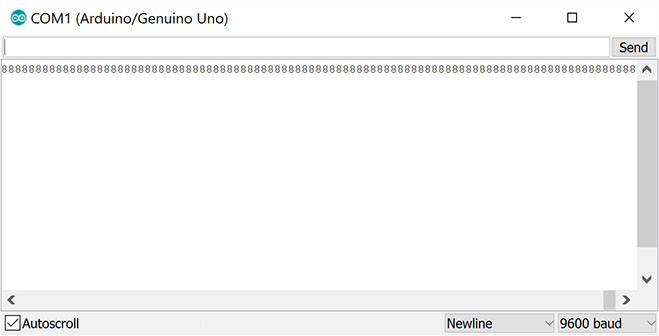
All of them works fine. The disadvantage of the last ones is that occupying the serial port pins, it will not be possible to monitor the serial port.
This is what the serial monitor shows
So finally I remain with this configuration:
LiquidCrystal lcd(5, 4, 3, 2, 1, 0);
Some lines to command the LCD were adding to the project.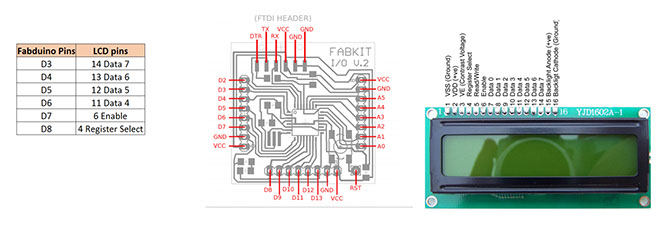
Step 6 Calculating Dew Point
Referenced page from Arduino page
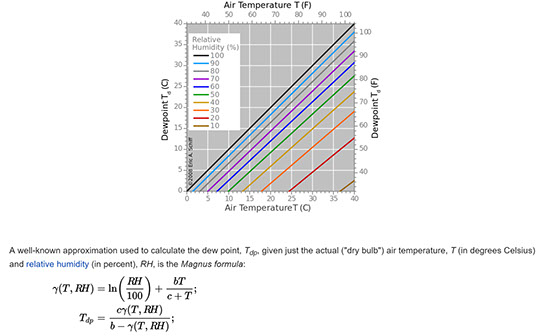
In this wikipedia page we found reference of calculating the Dew Point
There the definition is very precise:
"In simple terms, the dew point (dew point temperature or dewpoint) is the temperature at which a given concentration of water vapor in air will form dew. More specifically it is a measure of atmospheric moisture. It is the temperature to which air must be cooled at constant pressure and water content to reach saturation. A higher dew point indicates more moisture in the air"
There are also pages that have online calculators. They will be usefull to test and compare values.
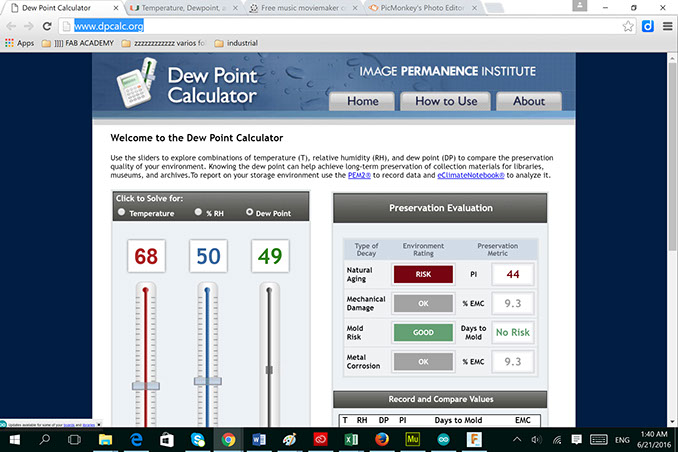
Dew Point needs the celsius- temperature and the humidity percentage to be calculated. I found this double function for processing.
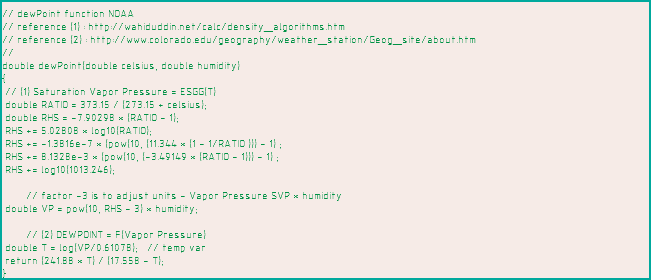
I added the below dewPoint function, and made the calls from the void loop() procedure.
The final sketch is this.