Drawing Robot
Document a final project that integrates the range of units covered, answering:
-
Final project presentation
- What does it do?
- Who's done what beforehand?
- What materials and components were used and their cost?
- Where did they come from?
- What did you design and what parts and systems were made?
- What processes were used?
- What questions were answered?
- How was it evaluated?
- what tasks need to be completed and schedule?
What does it do?
The mural drawing robot is intended to make me learn about programming, physics, trigonometry, and electronics for the pupose of this class. The drawing robots takes inputs data from the wind or a blow and vibration and interaction from us to draw "portrait" of its surrounding.
Who's done what beforehand?
There is a lot of drawing robot made and it was hard for me to pick a specific one. I would like to install it in a commercial window not larger than 3 x 4 meter. It would likely be easy to set up and even maybe portable for demonstration on fab lab demonstration day that I sometime host. A vertical designed drawing robot model would be appropriate. Fortunatly my friend Darcy White, maker and inventor at the Makerspace North in Ottawa, Canada, made a few of them that you may see here. 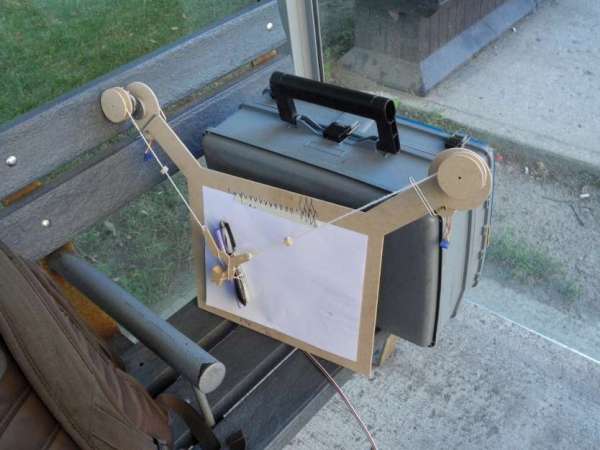
FAB ACADEMY
- Alexandro Papaleo
- Stepper Motor Controller made by Fab Academy student in Baltimore
- Drawbot made by Fab Academy student in Providence
- Drawbot made by Fab Academy student in IAAC
- FAB LAB Wellington
OTHER MAKERS
- Palargraph
- Makelangelo
- Der Kritzler
- GIJS VAN BON SandWritter, the Skryf
- Drawbot Constantly Writes Out the Time on a Whiteboard
- The mDrawBot
- Turn Two Old CD Drives into a RBpi Drawbot
- TRS Drawbot
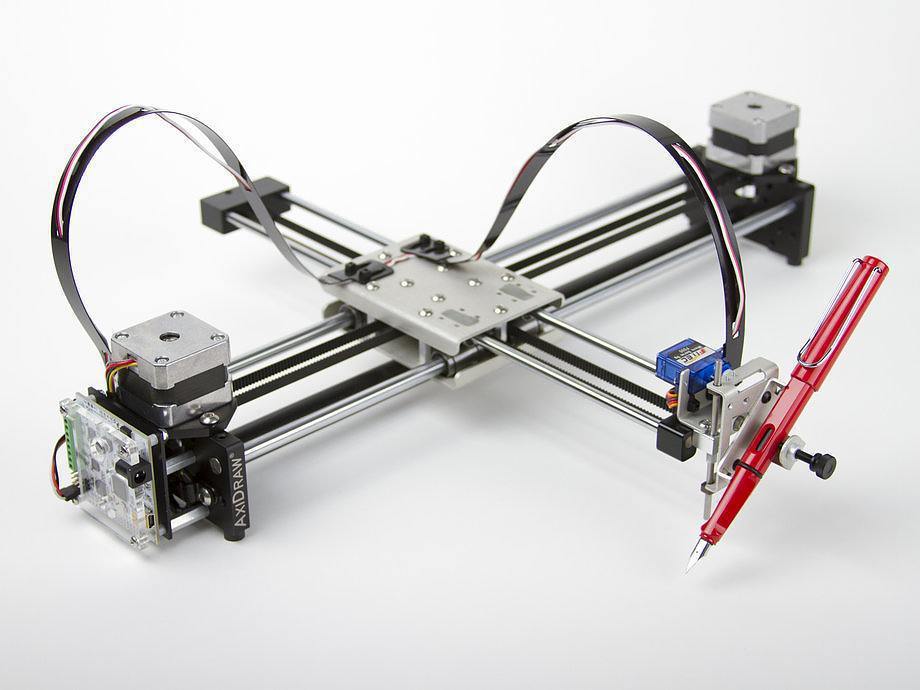
- AxiDraw
- WatercolorBot
- FAB LAB Wellington
USEFULL LINKS
- Controlling a Stepper Motor with an Arduino Part 1
- Controlling a Stepper Motor with an Arduino Part 2
- Method for controlling 4 steppers from Arduino and two Motor Shields from Adafruit
Where did they come from?
Most of the components came from the Fab Lab Inventory. Those that were not were, the Nema 17 from Letmeknow.com, Adafruit Motorshield from Adafruit and Screw and bolts from the local harware store.
What materials, Components and Cost
| Qty | Value | Device | Package | Parts | Description | Description |
| 1 | 6MM_SWITCH6MM_SWITCH | 6MM_SWITCH | S1 | OMRON SWITCH | 0.50 | |
| 1 | DIODESOD123 | SOD123 | D1 | DIODE | 0.10 | |
| 1 | M06SMD | 1X06-SMD | JP2 | Header 6 | 0.20 | |
| 7 | 0 | RES-US1206FAB | R1206FAB | R3, R4, R5, R6, R7, R8, R9 | Resistor (US Symbol) | 0.10 |
| 1 | 1 uF | UNPOLARIZED_CAPACITOR1206 | 1206 | C1 | unpolarized_capacitor | 0.15 |
| 1 | 10k | RES-US1206FAB | R1206FAB | R2 | Resistor (US Symbol) | 0.2 |
| 1 | 10uF | CAP-UNPOLARIZEDFAB | C1206FAB | C4 | 0.15 | |
| 1 | 499 | RES-US1206FAB | R1206FAB | R1 | Resistor (US Symbol) | 0.2 |
| 1 | 8Mhz | RESONATOR | EFOBM | CR | 0.25 | |
| 1 | ARDUINO-USBLONG_PADS_NO_TEXT | ARDUINO-USBLONG_PADS_NO_TEXT | SHIELD-NOTEXT | PIN | The Ardiuno Duemilanove Pinouts layoutet as a Bare Shield. v0.5 | 3.0 |
| 1 | ATMEGA168-AU | ATMEGA168-AU | TQFP32-08 | IC1 | 3.0 | |
| 1 | AVRISPSMD | AVRISPSMD | 2X03SMD | U$3 | 0.20 | |
| 1 | LEDFAB1206 | LEDFAB1206 | LED1206FAB | LED-AVR | LED | 0.15 |
| 1 | version 1 | Motor Shield | AdaFruit | |||
| 2 | 17 | NEMA | Stepper Motors | 50.00 | ||
| 1 | 8 lbs | Fishing lines | Monofilament | 3 | ||
| 1 | 3mm | Motor, pen holders | Canus Acrylic sheet | 20 | ||
| 8 | 3mm | Screw and washers | 8 | |||
| 1 | pen, elastics, paper | 5.0 | ||||
| 1 | 3mm | MDF | 2'x4' | Wood | 3 | |
| TOTAL | 97.60 $ CA |
What did you design and what parts and systems were made?
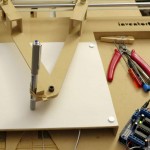
Most of the parts where redesign and home made except for the nema motor and Adafruit shield. The PhonDUINO was base on Alessandro Papaleo Brain Module (fabDuino). I made a few type of spool design and Nema Holder but for the purpose time and purpose the pen holder were kept from Darcy Whites, Drawbot for the finals. This of course is in the making. I will eventually work on it to present it at the Ottawa Makerfair in September 2016, all of my own design.
Here are the few things that I changed on the PhonDuino :
What processes were used?
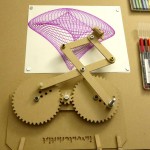
Process is mostly described here. I started researching and build parts and electronics during the weeks of assignments. I played around with an arduino and Motorshield and Polargraph first and decided to add sensor to do basic sensor input for a human and environment interactions drawbot. I basically used the knowledge we learned here to make the mechanical, electronical and overall design. For more on the process, see this Project Process Page.
What questions were answered?
For human interaction, I was woundering how would it be fun to interact with a drawing robot. A piezo takes sounds and vivration and I thought that if the robot is installed on a commercial window, people can knok or tap or just wals on the carpet. The microphone cans be use as a wind sensor to catch a blow. Steps of visitors would make drawing noises and the robot can draw something more figurative if we blew in the microphone.That would be the first way to do it if I were to have wind sensor installation limits outside.
For Electronic parts, I was wandering how we can make a basic Arduino on one board that would be compatible with Adafruit Motorshield.
For the mechanical parts, my robot was on a a small wood designed structured stand and spool had been loaded with fishing lines, sometime the pen holder would go off the grid and the fishing line would end up all entagled. I was woundering if it would not be better to make a fixed arm like in a TRS Drawbot because the piezos sensors were sending my motor to much in one directions and the fishing line taht use to be a good solution for holding the pen for drawing with Polygraph software seems not to be an elegant with piezos driven stepper motors. But I took all the extra line of and it never went further than it should. Perhaps, I could give it a square limit in the code. This has to be tested.
In a more broader sense application and implications of making this is like a sparkle that lights a fire. I always had to have reasons to do or not to make an object and I would sometimes envy the artist who dares share their moment of expression with abstract art, like a flow of energie that just needed to come out. I often feel like that but it doe not mean that it is worth sharing. I often asked myself among all the scope of things I could make why did I chose this one. Because going throught all this design to make a bot draw some gibberish on a sheet of paper can be viewed as contempory art bullshit! But I had to do it, I had to make it. BECAUSE I CAN. This is only the beginning of something much larger, which is to give ourselve the capacity and the freedom to create almost anything. I can create, share, collaborate and maybe make a difference along the way. I will pilot the first fab lab workshops project in multiple libraries in my city, Gatineau, Québec starting fall 2016.
I read Neil Gershenfeld book and wanted to share my favorite part that shares the idea:
 "We’re still living with the historical division of the liberal from the illiberal arts, with the belief that the only reasons to study fabrication are for pure art or profane commerce, rather than as a fundamental aspect of personal liberation. The past few centuries have given us the personalization of expression, consumption, and computation. Now consider what would happen if the physical world outside computers was as malleable as the digital world inside computers. If ordinary people could personalize not just the content of computation but also its physical form. If mass customization lost the “mass” piece and become personal customization, with technology better reflecting the needs and wishes of its users because it’s been developed by and for its users. If globalization gets replaced by localization. The result would be a revolution that contains, rather than replaces, all of the prior revolutions. Industrial production would merge with personal expression, which would merge with digital design, to bring common sense and sensibility to the creation and application of advanced technologies. Just as accumulated experience has found democracy to work better than monarchy, this would be a future based on widespread access to the means for invention rather than one based on technocracy. That will happen. I can say this so firmly because it is my favorite kind of prediction, one about the present. All of the technologies to personalize fabrication are working in the laboratory, and they are already appearing in very unusual but very real communities of users outside the laboratory. The stories of these technologies, and people, are the subject of the rest of this book." from "Fab: The Coming Revolution on Your Desktop--from Personal Computers to Personal Fabrication"
How will the project be evaluated?
Phase 1
- Electronics are good
- Motor mounts are effective
- Pen holder is appropriate
- Gondola fit-for-purpose
- Motors are correct
- Firmware is solid
- Bearings/pivots are super cute
- Weight distribution on gondola is perfect
- Reduced motor slippage on pulleys
- Break out for servo's are good
Phase 2
- Air sensor works well
- Interact well with user
- Pen holder is appropriate
What is the schedule?
My Fab Academy programmed was first schedule to be done in two years for two reasons, I was working full time and I was alone doing the program with a distant mentor. Luciana from the Fab Foundation told me that it is the source of most drop out to be doing it alone and they really do not encourage it. My schedule has been really hectic since the beginning and I found a way to get free to catch up with a team in Paris, at Woma, Fabrique de quartier for the last two months. I gave myselft a challenge to finish it all even if I had more than six weeks of delay. That was a good choice. Not only by the end of May, I did tree more weeks, and learn much more with a local instructor, I met really great friends! I also felt a momentum that really help me going every week and catch up. My schedules has been loaded with fun learnings and bad error, but Roman, Thomas and Guillaume was always there to give a hand. Thank you.
Here are the different steps in the development of my Fab Academy final project which consists in making a "Bot that enables us to draw with the wind"
Tasks have been completed, and what tasks remain
- Build the drawbot parts - Almost Done
- Wood structure for holding paper - DONE
- Spool - Done
- Pen holder
- Connect spools to the stepper motor shafts - DONE
- Mount the motors- DONE
- Wind monofilament fishing line on the spools - DONE
- Tie the fishing line to the pen holder - DONE
- Order electronic material or make a BOM of PhonDUINO
- Connect the Shield to the Arduino to test - DONE
- Load the Polargraph firmware - DONE
- Create a my version of arduino - In Progress
- Connect PhonDUINO motors to the shield
- Test the assembled electronics
- Calibrate the Robot
- Measure the diameter of the spools and distance between motors
- Save settings and upload your measurements to the robot
- Test!
- Add Piezo Sensor and code - Done with Arduino
- Add Piezo Sensor and code - Done with PhonDUINO
- test
- Add microphone
- Test
- Document
This is a few days before 3 exactly, the final due date. The next few days are to finish my final projects and complete my missing weeks.
- TODAY JULY 4th
Document 3D design, debut Network and communication Nodes
Final Project: make PhonDuino in eagle, mill - Tomorrow, JULY 5th
Document Molding and casting, Composit week
Final Project: solder PhonDUINO, Program test and install Final project. - Wenesday, JULY 6th
Complete and document weekweek 13, Output device, making a Hello motorshield
and week 16, Interface and Application Programming, following a tutorial.
Final Project: finish mounting and test drawbot, document, document, document!!! - Thursday,JULY 7th, last day Document and revise all
Final Project: Test and debug, list of things left to do before MakerFaire Ottawa, evaluttions and learnings